Loading…
Shonen TCG · General
Union Arena InuYasha Archetypes: Competitive Guide
10 min readBy Michael Riley
Reviewing
Union Arena
Three main Union Arena InuYasha archetypes have emerged from the JP UA50BT meta since its May 29 launch: Counter Rush, Sesshomaru Control, and Naraku Disruption. Choosing the right one before EN UE23BT drops on August 14 is worth getting right, because each plan attacks and defends in completely different ways.
TL;DR: JP meta data points to Counter Rush as the fastest and most accessible clock, Sesshomaru Control as the highest ceiling option, and Naraku Disruption as a B-tier archetype that thrives against Control but struggles against Counter Rush. Kagome is not a fourth archetype: her Purification engine is a cross-archetype support package inside Counter Rush and Sesshomaru Control. Pick Counter Rush if you want to close games before turn 5. Pick Control if you like card advantage and punishing greedy opponents. Pick Naraku Disruption if your local field is Control-heavy and you enjoy read-based play.
Which Union Arena InuYasha archetypes are strongest? (quick answer)
Based on JP UA50BT community data, Sesshomaru Control has the strongest late-game ceiling, Counter Rush is the fastest and most popular archetype among JP players, and Naraku Disruption sits at B-tier, a real standalone deck that beats Control cleanly but loses to Counter Rush more often than not. All three are viable for competitive play. The EN context will shift relative power levels slightly because the existing EN meta includes Yellow Evangelion as the current S-tier.
Why Your Archetype Choice Matters in Union Arena
Union Arena's 50-card single-IP format punishes unfocused builds more severely than most TCGs. You cannot reach across IP lines for better removal or better aggro pieces. Every card slot in an InuYasha deck competes against other InuYasha cards, which means the archetype framework is the backbone of every construction decision.
The ENTRY, FINAL, and TRIGGER card split also rewards having a clear game plan. FINAL cards are your most powerful effects, but playing them requires specific board states or resource investments. Counter Rush wants FINAL events that generate immediate tempo. Sesshomaru Control wants FINAL cards that reset board positions. Naraku Disruption wants TRIGGER-timed hand attacks that remove the opponent's key sequencing piece before it resolves.
Getting this wrong at the list-building stage means your deck is pulled in two directions. JP player data suggests that InuYasha decks that commit fully to one of the three archetypes outperform hybrid lists by a noticeable margin in head-to-head play.
GODEEPER: If you want the full card-by-card breakdown of what each character brings mechanically, the Union Arena InuYasha Sesshomaru and Kagome Guide covers their exact roles in deck construction.
Counter Rush: Jewel Shard Speed and Tessaiga Pressure
Counter Rush centers on the Inuyasha double-star SR leader, supported by a low-cost curve of ENTRY-trigger characters designed to establish a full field by turn 3. The core plan: deploy high-BP units at low AP cost, generate a Jewel Shard counter on each ENTRY, then use Tessaiga-based FINAL event cards to push damage through blockers.
What makes the archetype tick is the way it layers two engines together. JP community data suggests Inuyasha ENTRY units in the 2-3 AP range form the backbone of the early curve, creating a board the opponent cannot cleanly answer without trading unfavorably. Once 2-3 Jewel Shard counters are stacked, Kagome's Purification ability spends them for a card draw or power burst, and the Tessaiga FINAL cards convert that field advantage into damage that sticks.
The Counter Rush plan's strength is its clock. Against slower opponents who lack early answers, it can close games before the opponent's late-game power cards become relevant. This matters in competitive play because you win before the opponent's strategy comes online, not by out-grinding them. It is also the format's most accessible archetype and the first deck most JP players build.
The weakness is resource depth. Counter Rush commits its hand early and relies on Kagome's Purification spend to refuel. Against Sesshomaru Control, which has targeted removal that answers Inuyasha units efficiently, the deck can run out of pressure before landing enough damage. This matchup is the most skill-intensive for Counter Rush players.
Who should play this archetype: Players who prefer proactive, pressure-based play and who are comfortable managing a tight resource curve. It rewards knowing the exact BP thresholds of common removal effects in the opponent's IP.
Sesshomaru Control: Removal and Card Advantage
Sesshomaru Control takes the opposite approach. Sesshomaru's character cards feature high BP paired with effects that generate value on play or on resolution, making individual units harder to remove cleanly. The deck builds toward a late game where the opponent has exhausted their resources and Sesshomaru's remaining high-BP units close out the game without resistance.
The removal package relies on TRIGGER cards that activate when specific conditions are met in combat, letting the control player answer threats without spending AP on standalone removal events. JP community feedback frames this as the deck's primary strength. Standard removal in Union Arena costs resources; Sesshomaru's conditional TRIGGERS do similar work while also putting a body on the field.
Card advantage comes from units that draw on entry or that generate additional effects when surviving combat. Over a long game, Sesshomaru Control should be ahead on cards by turns 5 and 6, which is when its most powerful FINAL plays become relevant. Those finishers close the game from a position of informational and numerical advantage.
The matchup the archetype struggles with is fast Counter Rush with a clean draw. If the Counter Rush player deploys three units on turn 2 and the control deck draws a hand of late-game cards, the TRIGGER removal may come too late. Sesshomaru Control wins by managing the early game with mid-range BP units that survive early attacks, then transitioning into full control by turn 4. Naraku Disruption is the matchup Sesshomaru Control fears most; its hand denial collapses the multi-step sequences Control depends on.
Who should play this archetype: Players who enjoy reactive, read-based play and who are comfortable with slower decisions. Control in Union Arena requires predicting what the opponent will deploy before it hits the field, which is a higher execution demand than Counter Rush.
GODEEPER: The complete card list for Naraku villain support across all three archetypes is covered in the Union Arena InuYasha Naraku Villain Guide.
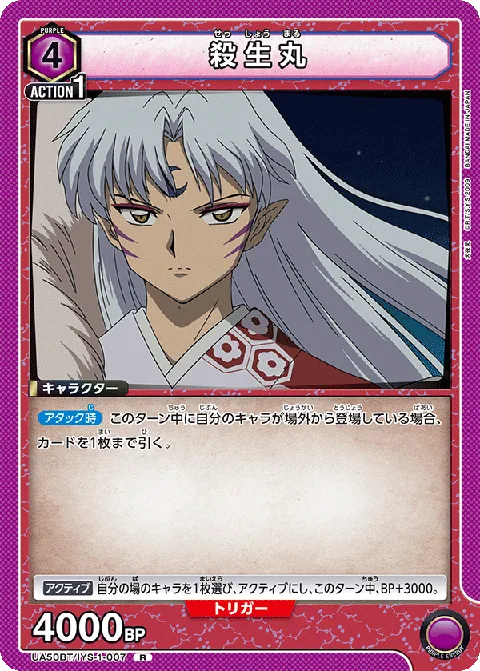 Sesshomaru (UA50BT-007) anchors the Control archetype, his high base BP combined with targeted removal effects makes the archetype genuinely difficult to attack into profitably.
Naraku Disruption: Hand Denial as a Standalone Plan
Naraku Disruption is a real, standalone archetype in the JP UA50BT meta, currently B-tier. Instead of racing the board like Counter Rush or grinding card advantage like Sesshomaru Control, Naraku Disruption reads the opponent's hand sequence and removes the one piece that makes their turn work. It does not race a clock; it denies one.
The deck's clearest win condition is Sesshomaru Control. Control's game plan depends on multi-step hand sequences arriving in a specific order, and Naraku's disruption effects can identify and remove the pivot card before it resolves, collapsing the opponent's turn before it develops. Against Counter Rush, the matchup narrows: Counter Rush does not chain decisions the same way, so there are fewer sequencing pivots for Naraku to attack, and Counter Rush's flooded board can outpace disruption entirely.
Naraku Disruption carries the highest skill floor of the three archetypes. Correct target selection is the whole game. A correct read collapses the opponent's turn; a wrong guess wastes your own tempo and hands the opponent a free development window. It is not a beginner-friendly deck, but in a Control-heavy local field, a skilled Naraku pilot outperforms both other archetypes.
Naraku villain cards also see play outside the dedicated shell. Because the single-IP restriction does not limit which InuYasha cards you can include, 1-2 copies of Naraku's disruption effects splash as tech into Counter Rush or Sesshomaru Control builds without requiring a full commitment to the archetype. That tech splash is separate from the standalone Naraku Disruption deck covered here.
Who should play this archetype: Players who enjoy read-based, information-heavy play and who have logged enough games to recognize an opponent's hand sequence. It rewards meta awareness. In a field with little Control, Naraku Disruption's win condition narrows significantly.
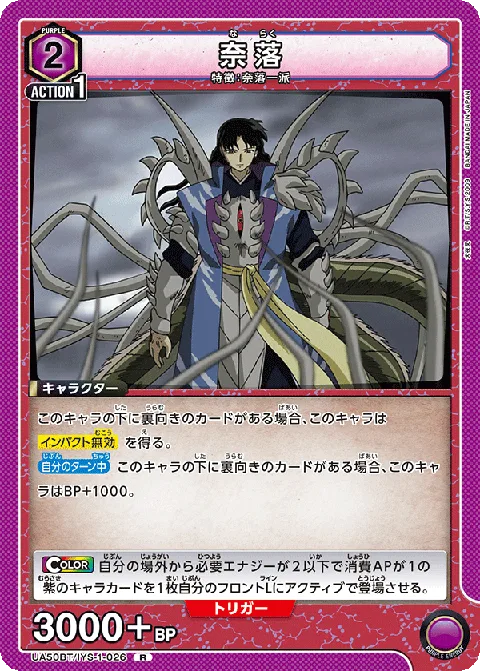 Naraku (UA50BT-026) anchors the standalone Disruption archetype's hand-denial plan; his effects also see play as a 1-2 card tech splash in Counter Rush and Sesshomaru Control builds.
Where Kagome Fits: Cross-Archetype Support, Not a Fourth Archetype
Kagome is not a standalone archetype in Union Arena InuYasha, and she is not a "midrange" plan sitting between Counter Rush and Control. Her Purification ability, which spends accumulated Jewel Shard counters for card draw or a power boost, is a cross-archetype support package that appears inside both Counter Rush and Sesshomaru Control at different ratios: roughly 30-40% of Counter Rush lists and 20-30% of Sesshomaru Control lists in JP data through week 7.
That distinction matters for list building. If you are choosing your InuYasha archetype, the choice is Counter Rush, Sesshomaru Control, or Naraku Disruption, not "how much Kagome do I want." Kagome cards get slotted into whichever of the first two archetypes you pick, refueling Counter Rush's hand after it floods the board and maintaining Sesshomaru Control's card advantage during removal sequences.
How to Pick Your Union Arena InuYasha Archetype
Three questions determine which InuYasha archetype fits you.
First: how do you handle resource pressure? Counter Rush requires committing resources early and recovering through Kagome's Purification spend. If running low on cards in hand makes you uncomfortable, Counter Rush still has the most forgiving learning curve of the three because that spend is on a predictable schedule. Sesshomaru Control maintains hand size more reliably through mid-game, and Naraku Disruption's resource use depends entirely on reading the opponent correctly.
Second: how familiar are you with Union Arena timing rules? Sesshomaru Control's TRIGGER-based removal and Naraku Disruption's hand-denial effects both work on specific timing windows. If you are new to Union Arena, getting those timings wrong at a tournament table costs you matchups you should win. Counter Rush has a more forgiving timing requirement because its Jewel Shard engine works on a straightforward turn-by-turn plan.
Third: what does your local EN meta look like? Yellow Evangelion currently sits at S-tier in EN and uses a fairly aggressive field-building strategy. Sesshomaru Control handles that matchup well because its targeted removal answers Yellow Evangelion's key BP units. If your local field is Evangelion-heavy, Control is a stronger call than Counter Rush. If your local field is Control-heavy instead, Naraku Disruption becomes the stronger call. The Union Arena beginner deck tier list covers the current EN meta in more detail.
For most EN players coming into InuYasha fresh on August 14, Counter Rush offers the best combination of power and learnability. It rewards improvement, it handles the existing EN meta reasonably, and it does not require deep understanding of opponent archetypes to perform. As you log more games, the Sesshomaru Control ceiling and the Naraku Disruption skill floor both become worth reaching for.
Key Takeaways
- Counter Rush wins through fast field pressure, Jewel Shard counters, and Tessaiga-based FINAL events; the most accessible archetype and best for beginners
- Sesshomaru Control wins through card advantage and conditional TRIGGER removal; highest ceiling but requires reading opponent sequencing
- Naraku Disruption wins through hand denial, removing the opponent's key sequencing piece; B-tier, beats Control cleanly, struggles against Counter Rush
- Kagome is not a fourth archetype: her Purification engine is cross-archetype support inside Counter Rush and Sesshomaru Control, not a standalone plan
- For EN launch on August 14, Counter Rush is the recommended starting point; Sesshomaru Control is the upgrade path once you understand the format
- The EN meta includes Yellow Evangelion at S-tier, which Sesshomaru Control handles better than Counter Rush
Related Reading
- Union Arena InuYasha Complete Set Guide: Full card list analysis and rarity breakdown for UE23BT, covering what to open and what to trade for.
- Union Arena InuYasha Deck Building Guide: Step-by-step construction guide for InuYasha decks, including card ratios and curve targets for each archetype.
- Union Arena InuYasha Competitive Tier List: JP and EN tier rankings for InuYasha leaders and key units, updated through the UA50BT JP launch.
- Union Arena How to Play Rules Explained: Core Union Arena rules reference covering ENTRY, FINAL, and TRIGGER mechanics for players new to the format.
- Union Arena InuYasha EN Buying Guide: Box and single purchase recommendations for EN UE23BT, sorted by archetype priority.
- Union Arena InuYasha EN Singles vs Sealed: Full Math: EV math showing why buying singles for competitive cards saves 5-10x compared to opening sealed boxes.
- Union Arena InuYasha Jewel Shard Mechanic Explained: How Jewel Shard counters accumulate, when to spend them, and why Counter Rush is the archetype most dependent on this mechanic.
- Union Arena InuYasha EN Starter Deck Review: What comes in each starter deck, which archetype each one supports, and how to upgrade to a competitive build from there.
- Union Arena InuYasha EN Launch: What to Buy in 2026: Full EN product lineup and where to buy ahead of the August 14 release.
- Union Arena InuYasha Collector Guide: SR Rarity and Value: SR and SR+ card values and grading considerations for the cards these archetypes are built around.
- Union Arena InuYasha Best Cards to Pull: Value Guide (2026): Which specific singles hold the most value across the Counter Rush, Control, and Naraku Disruption shells.
Frequently Asked Questions
Which InuYasha archetype is best for beginners in Union Arena?
Counter Rush is the most forgiving starting point. The deck floods the board with low-cost ENTRY units and lets Kagome's Purification ability convert Jewel Shard counters into card draw, so the plan stays simple even when a turn is sequenced imperfectly. Sesshomaru Control and Naraku Disruption both punish misreads harder.
How does Counter Rush win games in Union Arena?
Counter Rush pressures the opponent by filling the field with low-cost ENTRY units early, stacking Jewel Shard counters, and spending them through Kagome's Purification ability for card draw or a power boost. Tessaiga-based FINAL events then push that advantage through blockers before the opponent's late-game cards come online.
What makes Sesshomaru Control different from other Union Arena control decks?
Sesshomaru Control uses high-BP removal units and targeted TRIGGER effects to answer threats without relying on board floods. Unlike defensive stall decks in other Union Arena IPs, Sesshomaru builds maintain card advantage by having units that replace themselves on play, making the deck hard to outgrind.
Can you mix archetypes in a Union Arena InuYasha deck?
Mixing Counter Rush and Sesshomaru Control core pieces weakens both plans, since each relies on a different curve. Naraku Disruption is its own standalone archetype, but 1-2 Naraku tech cards do splash into Counter Rush or Control as a light disruption package without requiring the full Naraku shell.
Will the EN InuYasha meta mirror the JP UA50BT meta exactly?
Not necessarily. EN releases sometimes adjust card ratios or include errata, and the EN meta context differs because players are comparing InuYasha against the existing EN card pool. Yellow Evangelion currently dominates EN, so your archetype choice should account for how it handles that matchup specifically.
What is the Union Arena InuYasha EN release date?
Union Arena UE23BT (the English InuYasha set) releases on August 14, 2026. The JP equivalent, UA50BT, launched on May 29, 2026, giving EN players roughly 11 weeks of JP meta data to draw from before competitive play begins.
Does Naraku work as a standalone archetype in InuYasha Union Arena?
Yes. Naraku Disruption is a real standalone archetype in the JP UA50BT meta, sitting at B-tier by removing the specific card an opponent's sequence needs rather than racing the board. It also sees 1-2 copies as a tech splash in Counter Rush or Sesshomaru Control, but its own shell is what wins games.
References
- Union Arena Official Site: card database and official format rules
- Bandai Card Games UE23BT product page: official EN InuYasha set information and release details
- Union Arena InuYasha complete hub: aggregated InuYasha content and community deck discussion
Was this guide helpful?
About the author

TCG Deck Analyst
Former card game tournament organiser turned analyst. Covers One Piece TCG meta, deck efficiency, and card valuation. Builds spreadsheets for decks most people just play.
- Regional TCG tournament organiser
- One Piece TCG meta specialist
- Competitive deck analysis
Disclaimer
This article is published for informational and entertainment purposes. It does not constitute professional financial, legal, or technical advice. Game performance, online services, patch schedules, and store listings change. Verify critical details (pricing, system requirements, regional availability) with publishers and storefronts before you buy. Affiliate links, where present, help support our editorial work and are labelled in our affiliate disclosure.