Loading…
Shonen TCG · General
Union Arena InuYasha Jewel Shard Mechanic Explained
9 min readBy Michael Riley
Reviewing
Union Arena
The Union Arena InuYasha Jewel Shard mechanic is what sets this IP apart from every other Union Arena set. Unlike Bleach's rush strategy or JJK's technique chain system, InuYasha asks you to manage a resource that builds over multiple turns before it pays off in a single explosive swing.
TL;DR: Jewel Shard counters accumulate on InuYasha characters through entry and attack triggers. You spend them via Kagome's Purification for scaled effects (draw, power boosts, Full Demon activation). Counter Rush floods counters fast for a turn-3 spend burst. Sesshomaru Control builds counters slowly and uses Full Demon InuYasha at 4 counters as the singular win condition. You cannot shortcut counter gain by paying resources. EN release UE23BT hits August 14, 2026.
What Is the Union Arena InuYasha Jewel Shard Mechanic?
The Jewel Shard mechanic is a counter-accumulation system found only in the InuYasha IP set (JP: UA50BT, EN: UE23BT). It represents the Shikon Jewel fragments that drive the entire InuYasha anime storyline, translated into a card game resource you accumulate and spend.
Here is the mechanic at its core: specific InuYasha characters gain Jewel Shard counters when they enter play, attack, or meet conditions printed on their individual cards. Those counters sit on your characters. Kagome's Purification ability lets you spend them for effects that scale with how many you spend. At 4 counters on InuYasha specifically, Full Demon InuYasha can activate and replace the base card.
This system differs from standard power-up mechanics in Union Arena. Other IPs let you chain effects immediately. InuYasha forces you to plan two to four turns ahead, bank your counters correctly, and choose the right moment to spend. Get the timing wrong and you waste a turn. Get it right and you swing for a board advantage the opponent cannot answer.
The Information Gain point competitors miss: counter accumulation is strictly action-gated, not resource-gated. You cannot pay energy or AP to accelerate it. Every counter requires a specific game action (entry, attack, or conditional trigger). This means decks that flood cheap characters gain counters faster not because they are more powerful but because they generate more entry and attack events per turn.
For a broader look at how this fits into the complete InuYasha set, the Union Arena InuYasha complete set guide walks through all three archetypes with card ratios and JP meta data.
How Jewel Shard Counters Accumulate
Understanding the accumulation side prevents the most common mistake new InuYasha players make: prioritizing expensive characters early and arriving at turn 4 with zero counters.
Entry triggers are the primary source of counters. Certain InuYasha IP characters generate a Jewel Shard counter when they enter your field from your hand. Low-cost characters (1-2 energy) are the most efficient because you can play two or three of them in the same turn, stacking entry triggers consecutively.
Attack triggers provide a secondary accumulation path. When specific characters attack and the attack resolves, a counter is added. This creates a meaningful decision point: attacking accelerates your counter engine but exposes you to your opponent's response cards. In slower control matchups, you might attack into a weak position purely to bank a counter.
Conditional triggers are found on individual cards and vary by rarity. Based on JP set previews, some higher-rarity cards generate counters on conditions like having three or more characters in play, or having counters already on specific characters. These create combo windows where one action generates multiple counters simultaneously.
The hard cap: A single character can hold a maximum of 4 Jewel Shard counters. Counter overflow does not carry over. This cap matters most for InuYasha himself, because Full Demon activation requires exactly 4 counters on InuYasha, not distributed across multiple characters.
GODEEPER: Want the full deck-building breakdown with card counts and energy ratios? Union Arena InuYasha Deck Guide: How to Build for EN 2026 →
How to Spend Jewel Shard Counters
Kagome is your spending engine. This is not optional. Without Kagome's Purification in your deck, accumulated counters sit idle and the mechanic provides no payoff. Running 3-4 copies of Kagome is the baseline for any InuYasha build.
How Purification scales: Kagome's ability lets you remove Jewel Shard counters from one or more of your characters. The effect triggered scales with the total counters removed:
- Spending 1 counter: small effect (draw 1 card or a minor power boost)
- Spending 2 counters: mid effect (draw 2 cards or a moderate power increase)
- Spending 3 counters: strong effect (draw 3 cards or a large power threshold boost)
- Spending 4 counters from InuYasha specifically: enables Full Demon InuYasha to enter play
These thresholds are based on confirmed JP set card text descriptions. The exact BP values and draw numbers are from JP release data and will be reflected exactly in the EN printing.
Spend timing matters more than spend quantity. Spending 2 counters on turn 3 when Kagome enters is usually stronger than waiting for 4 counters on turn 5 because you get the draw effect while you still have turns remaining to use the drawn cards. Counter Rush builds exploit this by deliberately spending 2-3 counters repeatedly rather than saving for Full Demon.
Full Demon activation is a spend condition, not a play cost. When InuYasha has 4 Jewel Shard counters and you remove all 4 via Kagome, Full Demon InuYasha can enter as an upgrade. If Kagome is not in play or in your hand when you hit 4 counters, that Full Demon window does not open until Kagome arrives.
Counter Rush: The Fast Accumulation Path
Counter Rush is the first archetype most players learn because it makes counter accumulation feel immediate rather than delayed.
The strategy: flood 1-2 energy InuYasha crew characters on turns 1 and 2. Each entry trigger adds a counter. By turn 3, you have 2-3 counters distributed across your board. Kagome enters on turn 3 (she sits at 3 energy cost based on JP data), immediately spends 2-3 of those counters for a draw burst, and you attack with the power-boosted characters for early BP pressure.
The turn sequence that makes Counter Rush work:
Turn 1: Play a 1-energy InuYasha crew character. Entry trigger fires. 1 Jewel Shard on the board.
Turn 2: Play two 1-energy characters if you have them, or one 2-energy character. Both generate entry triggers. 3 Jewel Shards total.
Turn 3: Kagome enters. Spend 2-3 counters for draw 2 or draw 3. Attack with your 3-card board into the opponent's weaker position.
Turn 4-5: InuYasha has been building counters through attacks. If he hits 4, Kagome spends them for Full Demon. If not, the extra draws from turn 3 let you rebuild the board faster than the opponent.
The vulnerability is Kagome removal. If your opponent has an event card that removes Kagome before you spend counters, your accumulated counters stay locked on characters with no outlet. Running 4 copies of Kagome and keeping one in hand after the first is removed is the standard response to this problem.
Kagome serves as the Jewel Shard spend engine in all InuYasha archetypes. Counter Rush spends early and often; Sesshomaru Control waits for the 4-counter Full Demon window.
Sesshomaru Control: The Patience Path
Sesshomaru Control uses the Jewel Shard mechanic as a background engine while Sesshomaru and Kikyo handle the early defensive load.
The difference from Counter Rush is in priority. Counter Rush spends counters as soon as 2-3 accumulate. Sesshomaru Control holds counters longer, targeting the 4-counter Full Demon threshold as its decisive swing rather than the mid-level draw effects.
This works because Sesshomaru and Kikyo are expensive enough (4-5 energy cost based on JP previews) to stabilize the board without needing the Kagome spend to survive early aggression. You defend with your high-BP pieces and let InuYasha build counters through incidental attacks rather than dedicated flooding.
Why hold for 4 counters instead of spending at 2-3? In control mirrors and against mid-range decks, the Full Demon activation is a board swing your opponent has no single answer for. Counter Rush's repeated 2-counter spends create incremental advantages. Sesshomaru Control's single 4-counter spend creates one massive advantage. Against aggressive decks that are trying to end games by turn 5, holding for 4 counters is too slow. Against control and mid-range, it is the correct path.
For players who want to compare how these archetypes stack up against each other before committing to a build, the Union Arena InuYasha deck archetypes breakdown covers the full matchup matrix from JP data.
GODEEPER: Wondering which InuYasha cards to prioritize as singles for EN launch? Union Arena InuYasha Best Cards to Pull →
Common Jewel Shard Mistakes
These are the errors that appear most consistently in new InuYasha players based on JP community reports.
Mistake 1: Playing high-cost characters on turn 1-2. Sesshomaru and Naraku are strong cards, but they do not generate Jewel Shard counters on entry the way low-cost crew characters do. Opening with them leaves you at 0-1 counters by turn 3, which means Kagome's first spend is weak. Reserve expensive characters for their designated turn windows.
Mistake 2: Holding Kagome out of fear. The instinct to save Kagome for the "right moment" causes players to sit on 3-4 counters for two extra turns while drawing nothing. Spend at 2-3 counters consistently. The card draw from Purification lets you find more counter generators and rebuild faster than saving does.
Mistake 3: Ignoring Full Demon as a win condition in Counter Rush. Some Counter Rush players focus so hard on the draw engine that they forget the Full Demon activation is available. If InuYasha naturally accumulates 4 counters while you are running the draw loop, use Kagome to activate Full Demon instead of spending for draw at that specific moment.
Mistake 4: Spreading counters across too many characters. The cap is 4 counters per character. If you are building toward Full Demon, all 4 counters must land on InuYasha specifically. Spreading counters across three characters means no single character hits the activation threshold.
Mistake 5: Not accounting for Kagome's energy cost. Kagome has a 3-energy cost based on JP data. If your opening hand is heavy on 1-energy crew but light on energy generators, Kagome arrives on turn 4 or 5 instead of turn 3. Build your energy generation to reliably hit 3 energy by turn 3.
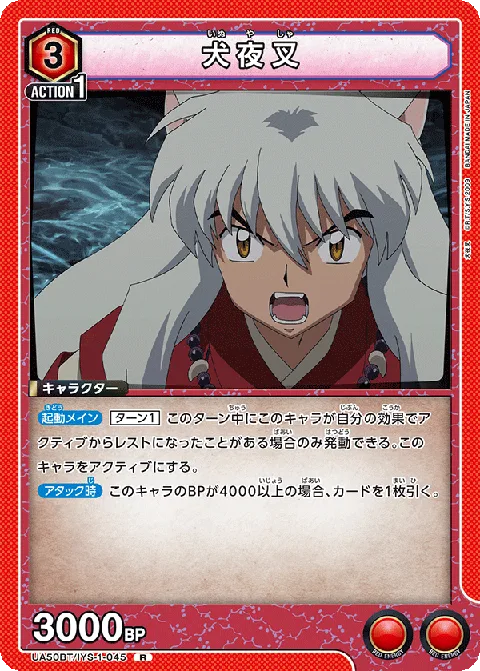 Inuyasha's Full Demon form (UA50BT-045) is the payoff for reaching 4 Jewel Shard counters , spending through Kagome versus saving for this transformation is the central timing decision in all InuYasha builds.
Jewel Shard Timing Reference
A quick reference for the key timing decisions in a standard game:
| Turn | Counter Rush Priority | Sesshomaru Control Priority |
|---|---|---|
| 1-2 | Flood entry triggers | Defensive character setup |
| 3 | Kagome enters, spend 2-3 counters | Hold counters, Sesshomaru enters |
| 4 | Rebuild board, attack | InuYasha builds to 3-4 counters |
| 5+ | Full Demon if natural 4 counters | Full Demon activation, close game |
Key Takeaways
- Jewel Shard counters accumulate only through actions (entry, attack, conditional triggers), never through direct payment
- Kagome is the mandatory spend engine; run 3-4 copies or the mechanic fails
- Counter Rush spends at 2-3 counters repeatedly for draw advantage
- Sesshomaru Control holds for the 4-counter Full Demon window
- Full Demon requires 4 counters on InuYasha specifically, not distributed across the board
- EN set UE23BT launches August 14, 2026 with the same card pool as JP UA50BT
For players building their first InuYasha deck, the Union Arena how to play rules guide covers the foundational mechanics that support understanding how counter spending fits into the overall turn structure.
Related Reading
- Union Arena InuYasha Complete Set Guide: All three archetypes with card ratios, JP competitive standing, and box EV analysis for EN launch.
- Union Arena InuYasha Deck Building Guide: Step-by-step IP deck construction with energy curve breakdowns and card count recommendations.
- Union Arena InuYasha Deck Archetypes: Full matchup matrix for Counter Rush, Sesshomaru Control, and Naraku Disruption.
- Union Arena InuYasha Best Cards to Pull: SR pull rates, singles priority list, and box EV for EN launch collectors.
- Union Arena How to Play: Rules Explained: Core rules, turn structure, and card type breakdown for players new to Union Arena.
- Union Arena InuYasha Archetypes: Competitive Guide: Which archetype uses Jewel Shards most effectively and why Counter Rush maximizes shard tempo in competitive play.
References
- Union Arena Official Site (JP): Source for UA50BT set information and official card previews
- Bandai TCG Product Listing: EN UE23BT release details and official card list confirmation
- r/UnionArenaCardGame: JP community reports on Counter Rush and Sesshomaru Control performance
Frequently Asked Questions
Q: What is the Jewel Shard mechanic in Union Arena InuYasha? A: The Jewel Shard mechanic is a counter-accumulation system exclusive to the InuYasha IP. Characters gain counters through entry and attack triggers. Spending those counters via Kagome's Purification triggers effects that scale with how many counters you remove.
Q: How many Jewel Shard counters does Full Demon InuYasha require? A: Full Demon InuYasha requires 4 Jewel Shard counters on the existing InuYasha character. Kagome spends all 4 through Purification to enable Full Demon to enter play as an upgrade.
Q: Can you pay to add Jewel Shard counters directly? A: No. Counters accumulate only through game actions: character entry triggers, attack triggers, and conditional triggers on individual cards. There is no way to shortcut accumulation with energy or AP.
Q: When does Union Arena InuYasha release in English? A: EN set UE23BT releases August 14, 2026. The JP set UA50BT launched May 29, 2026, giving EN players roughly 10 weeks of JP data to study.
Q: Which archetype uses the Jewel Shard mechanic most efficiently? A: Counter Rush accumulates and spends the most counters per game. It floods low-cost characters for rapid entry triggers and spends 2-3 counters per Kagome activation rather than waiting for the 4-counter Full Demon threshold.
Q: Is the InuYasha Jewel Shard deck hard to learn? A: Moderate difficulty. Counter Rush is the accessible entry point because entry triggers fire automatically. Sesshomaru Control requires better timing judgment since you hold counters longer and need to read when the Full Demon swing closes the game.
Q: What cards are best for generating Jewel Shard counters fast? A: Low-cost 1-2 energy InuYasha IP characters with entry triggers, confirmed from JP release data. Miroku from the starter deck is the most budget-accessible counter generator. Kagome is the mandatory spend engine.
Was this guide helpful?
About the author

TCG Deck Analyst
Former card game tournament organiser turned analyst. Covers One Piece TCG meta, deck efficiency, and card valuation. Builds spreadsheets for decks most people just play.
- Regional TCG tournament organiser
- One Piece TCG meta specialist
- Competitive deck analysis

Disclaimer
This article is published for informational and entertainment purposes. It does not constitute professional financial, legal, or technical advice. Game performance, online services, patch schedules, and store listings change. Verify critical details (pricing, system requirements, regional availability) with publishers and storefronts before you buy. Affiliate links, where present, help support our editorial work and are labelled in our affiliate disclosure.